Mike Blenderman, K7IC passed in 2022. This December 2021 mirror
of his onfreq.com site was extracted from the Wayback Machine.
[SYNTOR]
[SYNTOR X] [SYNTOR X 9000
and X 9000E] [TRUNKING SYNTOR
X and SYNTOR X 9000] [SPECTRA]
[INTRODUCTION]
[NEW RADIO INSPECTION] [NEW RADIO MODIFICATIONS] [FAIL AND ERROR CODE PREFIXES]
[SYSTEMS 9000] [PROGRAMMING]
[SYNTOR X 9000 CONVERSIONS] [MODELS] [MANUALS]
[CONTROL HEADS] [DEKS]
[CABLES] [BOARDS] [PARTS]
[OPTIONS and ACCESSORIES] [SYNTOR
X 9000 VISUAL TOUR]
[PL] [DPL] [PAC-PL
and PAC-RT VEHICLE REPEATERS][HHCH] [PROM
PROGRAMMERS] [POWER
WIRING]
[GLOSSARY]
[WEB LINKS] [SURPLUS
PARTS GUIDE] [ITEMS FOR SALE]
[WEB SITE REVISIONS]
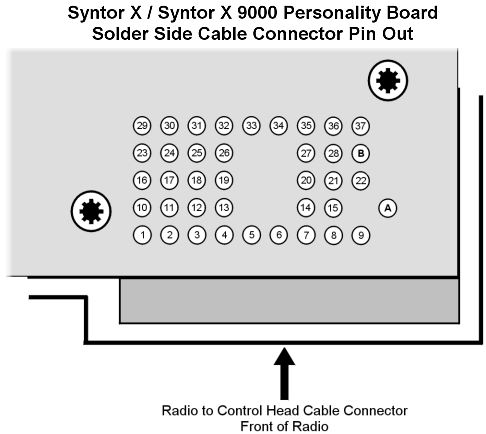
Personality Boards:
The conventional Syntor X 9000 and trunking Syntor X 9000E
use the same Personality Boards. The board part numbers are HLN4925
(earlier boards) and HLN5299 (later boards). For "normal"
use these boards only have slight differences depending on the
board part number and its revision letter. For special options
that go beyond "normal" use, the HLN5299 has lots more
optional capabilities built in (just compare the boards
in the jumper table below). The Personality
Board has the radio connector on it and is the external interface
for the radio.
The Syntor X 9000 was a significant departure from previous
radio models. For one thing, the Systems
9000 bus allowed the Rx volume control to be moved inside
the radio drawer and remotely controlled from the control head.
Older radio models placed the volume control inside the control
head and routed the actual Rx audio signal from the radio drawer,
through the control head and back into the radio drawer. This
basic change is why the Personality Board J1 pin 33 Option Rx
Audio connection was added to the Syntor X 9000. Older Systems
90 and Systems 90*s radio models would rewire the control head
audio signal path routing for options like Securenet. If you look
at the Securenet example, when clear audio is being received J1
pin 2 audio is sent to the speaker, but when encrypted audio is
being received J1 pin 2 audio has encrypted audio and only the
Securenet hardware has decrypted audio. The old way was to rewire
the control head so all J1 pin 2 audio is processed by the Securenet
option, sent to the control head volume control and then back
to the radio drawer. Since the audio volume control connection
was now buried inside the Syntor X 9000 radio drawer and not run
through the control head, the old method of rewiring the control
head audio connections no longer worked. So, the Option Rx Audio
connection was added and its Rx audio
path is remotely configured/selected via the Systems 9000
bus. Now any optional accessory that has to process the receive
audio or inject its own audio signal (this used to be called
Sidetone on older radio models) into the radio speaker, has a
way to do it, without having to rewire the control head. Other
than the microphone Tx audio input, older radio models used to
have dedicated input lines for specialized types of Tx modulation
(i.e. external Tx PL/DPL, Securenet Tx, etc.). These additional
dedicated old style connections have been combined into the Syntor
X 9000 J1 pin 3 Option Tx Audio line, with the Systems 9000 bus
configuring/selecting the actual Tx modulation audio
path. Another Systems 9000 change is J1 pin 1 PTT is not connected
to the control head any longer. Now the control head sends serial
data over the Systems 9000 bus to tell the radio drawer and any
Systems 9000 options when the microphone PTT has been pressed
or released.
As a result of this significant design departure, almost all
the Syntor X 9000 options have their own internal microprocessor
built into them to communicate with the Systems 9000 bus. The
exception is the old PAC vehicle repeater, which uses the Personality
Board J1 pin 1 PTT line to transmit through the radio drawer because
it does not have a Systems 9000 microprocessor.
The low band seems to be picky about the compensation adjustment,
much more than the VHF, UHF or 800 MHz radios. The low band does
use a unique reference modulation circuit not found in the other
radios. The compensation adjustment instructions are in the front
part of the low band manual
under the "Maintenance and Troubleshooting" section
and is really easy to do after you find R628 hiding near a corner
of the RF board. The problem I ran into was I could not adjust
the deviation on one radio above 4.6 KHz until after I did the
Compensation adjustment (the deviation pot was at maximum). After
the compensation adjustment I had to turn the deviation adjustment
down to get it below 5 KHz deviation.
| Syntor X 9000 Radio Connector |
Radio
J1 Pin # |
Radio Pin
Description |
| A |
A+ |
| B |
A- |
| 1 |
PTT (Input) |
| 2 |
Detected Audio (Output) |
| 3 |
Option Tx Audio (Input) |
| 4 |
Reset (Input/Output) |
| 5 |
Busy (Input/Output) |
| 6 |
Switched B+ (Input) |
| 7 |
Switched B+ (Output) |
| 8 |
B- (ground) |
| 9 |
Filtered Audio (Output) |
| 10 |
Chassis (ground) |
| 11 |
Detected Audio Shield |
| 12 |
A+ (later
versions only - see below) |
| 13 |
Spare 2 |
| 14 |
Mic. Low (shield
ground) |
| 15 |
Filtered Audio Shield |
| 16 |
Write Enable (Input) |
| 17 |
Bus + (RS-422
Input/Output) |
| 18 |
Option Tx Audio Shield |
| 19 |
Bus - Shield |
| 20 |
B- (ground) |
| 21 |
Channel Activity (Output) |
| 22 |
Speaker Audio Low (Output) |
| 23 |
KEY (Input) |
| 24 |
Spare 1 |
| 25 |
Bus - (RS-422
Input/Output) |
| 26 |
Analog Ground |
| 27 |
Mic. Hi (Input) |
| 28 |
|
| 29 |
KID (Input) |
| 30 |
|
| 31 |
B- (ground) |
| 32 |
B- (ground) |
| 33 |
Option Rx Audio (Input) |
| 34 |
Option Rx Shield |
| 35 |
|
| 36 |
|
| 37 |
Speaker Audio Hi (Output) |
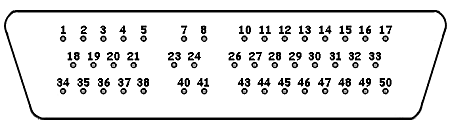
- Here is a pin locator drawing
for the solder side of the radio's J1 cable connector. It is accessed
by opening the radio handle, pushing the button to release the top
cover and removing the cover.
- Pin 1 PTT input is only used by options like the PAC vehicle repeaters which has no
Systems 9000 bus.
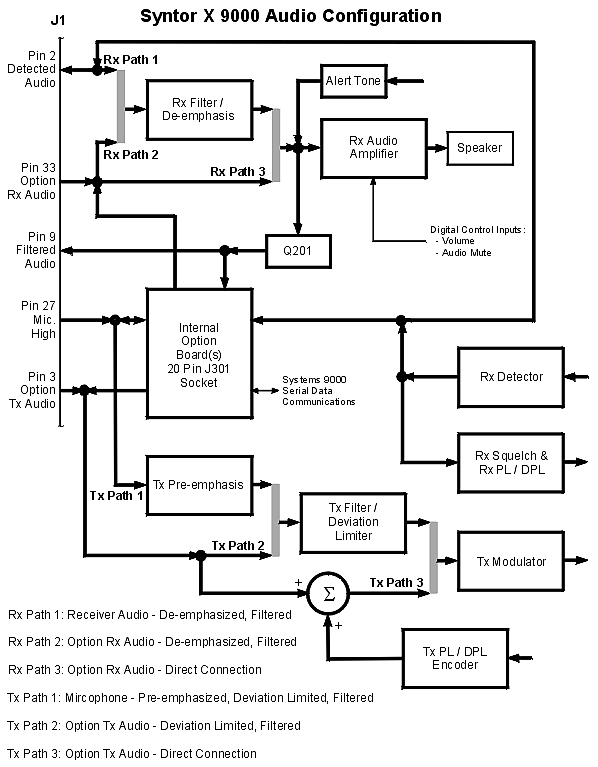
- Pin 2 Detected Audio output is the flat demodulated received signal
direct from the discriminator. There is no squelch audio muting or RAS on this pin.
- Pin 3 Option Tx Audio input is used by some internal option boards like
Securenet and external options like the Vehicle Repeater System. The
Option Tx Audio input does not add any audio pre-emphasis. The radio can
internally route this Tx audio input path through the deviation limiter
circuit with bandwidth filtering (its bandwidth is about 300 Hz to
above 3 KHz and then rolls off sharply) or it can go straight
into the VCO modulation circuit as flat
audio without any deviation limiter or bandwidth filtering (its
bandwidth is about 2 Hz to above 6 KHz and does not roll off sharply).
The microphone is the other Tx audio input path (see pin 27 below). A drawing is worth 1000 words.
- Pins 4, 5, 17 and 25 are the Systems 9000 serial communications bus which
connect the radio, control head, internal options and external options.
- Pin 9 Filtered Audio output is used by the some internal option boards and external
options like the Vehicle Repeater System. The filter circuit de-emphasizes the audio. The
filtered audio source can be from the radio's detected audio (pin 2) or
it can be from the option Rx audio (pin 33 or from an internal option
board). Any one of these audio sources (pin 2, pin 33 or and internal
option board) can be fed through the filter circuit that de-emphasizes
the audio and filters its bandwidth to be about 270 Hz to 3.5 KHz. This
will filter out PL or DPL from the received signal. In addition pin 33
can bypass this filter / de-emphasis circuit (i.e. flat) and go straight to pin 9. So
pin 9 can not be absolutely guaranteed to have filtered / de-emphasized
pin 2 Rx detected audio coming from it unless you know how pin 33 is
configured and then what type of source audio is being fed into pin 33.
A drawing is worth 1000
words.
- Pin 12 on the HLN4925 does not have any connection to A+.
It needs to be added for some
accessories.
- Pins 13 and 24 are Spare lines. Some
options like the PAC vehicle repeaters,
Motorola factory custom SP model radios or field modified radios may
use one or both spare lines. Sometimes a spare line is used to feed
power to the control head (a potentially dangerous practice unless a 3
amp fuse is placed before the spare line power connection).
- Pins 16, 23 and 29 are for programming the
encryption key into an optional internal Securenet board (a
special HKN4256A Securenet radio
cable is required to access these pins). The external Securenet
Physical Security Hosing does
not use these pins or this special radio cable.
- Pin 21 Channel Activity output is from the squelch
circuit and simply indicates any activity on the received frequency
(i.e. when the squelch is open). It is not conditioned by PL or DPL
(i.e. when this signal is active, the received PL or DPL, if any, may
or may not match what was programmed). This pin is not normally used,
as data sent through the Systems 9000 serial bus controls the green Rx
BUSY light on the control head.
- Pins 22 and 37 are the speaker output.
- Pin 27 Mic High input is the microphone audio
line. The Mic High input adds audio pre-emphasis. One of three different
audio paths exist to the transmitter. This path (Mic High) is one and
the other two are input from pin 3 or an internal option board (see
description above). A drawing
is worth 1000 words. The microphone pin is 600 ohms input impedance and
has a DC voltage applied to it to run the microphone preamplifier (the
preamp is built into the microphone). This line is also shorted to
ground when the programming cable is plugged into the RIB. When shorted it allows U502 to be
programmed via the RSS. Never power
the radio on of off when this pin is shorted as it may corrupt the code plug in the radio or control
head. Of course the microphone audio will not work when this pin is
shorted.
- Pin 33 Option Rx Audio input is used by some internal option boards like
Securenet and external options like the Vehicle Repeater System. It is
an alternate audio input to the radio's audio amplifier and out to the
speaker. Normally the speaker would get filtered / de-emphasized audio (see the pin 9
description above) using the radio's detected audio (pin 2) as its
audio source. Instead the speaker can get either filtered /
de-emphasized audio (see pin 9 above) using pin 33 as the audio source or
the speaker can get flat audio
using pin 33 as the audio source. This is a total of 3 different types
of audio configurations for the speaker. A drawing is worth 1000 words.
- The internal option boards have their own built in audio output
connect/disconnect control gates so they do not put a load on any audio
path when the option is not in use (i.e. they do not interferer with
the radio audio, other internal or external options audio). These
control gates are configured using serial data commands via the Systems
9000 communication bus.
- The pre-emphasis de-emphasis explanations are in the glossary.
- Both pre-emphasis and de-emphasis tend to distort data when used
with high speed modems (especially 9600 baud modems), so neither one is
used for fast data modes. PL and DPL are also not used during
low or high speed data transmissions, or when pin 3 Option Tx Audio is
used to transmit flat audio (like
when Securenet is being transmitted).
| SYNTOR X 9000 Personality Board Jumpers |
| Jumper |
HLN4925A |
HLN5299A |
HLN5299B |
Description |
| JU100 |
x |
|
|
Non-Securenet (* out for
low band) |
| JU100-JU105 |
|
x
|
x
|
Non-Securenet / Low Band |
| JU101-JU104 |
x |
x |
x |
Low Band / 800 MHz |
| JU102-JU103 |
x |
x |
x |
VHF / UHF |
|
JU200-JU201
|
x
|
x
|
x
|
Non-Securenet / Securenet (squelch) |
| JU500 |
x |
x |
x |
Test Mode |
| JU501-JU502 |
x |
x |
x |
2k / 8k EEPROM (32 / 64+ modes max) |
| JU503 |
|
|
|
Low Band Tx Buffer (see the notes below) |
| JU504-JU505 |
x |
x |
x |
Conventional / Trunking |
| JU506-JU507 |
|
x |
x |
U501 addressing |
| JU508-JU509 |
|
x |
x |
+ 5 V. / Gnd. U500
"MP0" pin |
| JU510-JU511 |
|
x |
x |
+ 5 V. / Gnd. U500
"MP1" pin |
| JU512-JU513 |
|
x |
x |
U502 addressing |
| JU514-JU515 |
|
x |
x |
2k or 8k /
16k U502 EEPROM |
| JU516 |
|
|
x |
UHF Trunking |
- X means this jumper is present on the indicated revision
Personality Board.
- The highlighted jumpers are found on the solder side of the
Personality Board under a shield. They are zero ohm chip resistors that
are soldered in place.
- All of the HLN4925A jumpers are pairs that share a common center
pin except for JU100 and JU500.
- All of the HLN5299A jumpers are pairs that share a common center
pin except for JU500.
- All of the HLN5299B jumpers are pairs that share a common center
pin except for JU500 and JU516.
- When jumpers share a common center pin, the jumper must be placed
from the center pin to one or the other outside pin (you can also
not install the jumper at all). All 3 common pins are never
jumpered together. For example: JU200 can be installed or JU201 can be
installed, but JU200 and JU201 should never be installed
at the same time (it would take a special 3 pin jumper not provided
with the radio or circuit modification to make this mistake anyway).
The jumper locater drawings show the common center pin as a white
circle and the outside pins as dark circles (or dark squares for the
chip resistor jumpers).
- JU100 is removed for high deviation, wide bandwidth transmissions
like Securenet to prevent leakage through transistor Q100 from
distorting the modulation signal.
- JU101, JU102, JU103 and JU104 tailor the audio response of the
reference modulation line for each different band of radio.
- JU105 bypasses C105 for better performance with the low band
radio's reference modulation circuit. The low band has a physically
different reference modulation circuit than any other Syntor X 9000
radio, so this bypass is only safe on the low band radios.
- JU200 and JU201 change the squelch circuit response
characteristics.
- JU500 is only used when the radio is being serviced on the test
bench (it must be installed before the radio is powered on to enter
test mode). One thing it does is prevent the radio's watchdog timer
from issuing resets to the radio (to allow troubleshooting and repair
of problems causing excessive radio watchdog resets). It also allows
the volume control to be adjusted in much finer steps than normally
allowed (for SINAD measurements, etc.). Test mode is not suitable for
normal operation.
- JU502 on the HLN4925 does not support a 16k EEPROM (see next
paragraph for 8k upgrade replacements).
- JU502 and JU515 only allows the use of 16k of a standard 32k
28256 or 28C256 EEPROM chip. As far as I know, no 16k 28128 or 28C128
EEPROM chips were ever manufactured. The conventional RSS does not seem
to be able to use the added 8k of space (16k total), so it must be used
by the trunking Syntor X 9000E or a SPxx radio version, if at
all. The 32k EEPROM chip can also be used as an 8k EEPROM (all jumpers
are set for the 8k EEPROM) if you can not locate an 8k upgrade part.
- The HLN4925A has J503 next to JU102. JU503 looks like a jumper,
but both pins are shorted together by a printed circuit board trace and
it is actually Tx keyed 9.4 volts. It appears to be a power connector
for the low band radio Tx buffer. The HLN5299 printed circuit trace
layout was changed and the old J503 disappeared. This does offer a clue
to the missing JU503 below.
- JU503 could not be located on either version of the HLN5299
Personality Board even though it's on the schematic. According to the
schematic this is not really a jumper (see above). This part of the
HLN5299B schematic is the same as the HLN4925A schematic except for the
J503 label being changed to JU503. Also, JU503 suddenly appears in the
jumper table as "Low Band Tx Buffer" in the HLN5299B schematic. I
believe JU503 is an error in the manual and was actually deleted, but I
would like to know where the low band radio gets power for the Tx
buffer on the HLN5299 Personality Boards (I suspect the low band Common
Circuits Board has this power connection)?
- The HLN4925A is an early version of the Syntor X 9000 Personality
Board. There is some confusion in the documentation about JU504 and
JU505 on this board. A manual revision shows this board with these two
jumpers added, but the revised parts list does not list a jumper for
either one. Since I do not have a real A revision board to check, I
added these jumpers to the table. I did find these jumpers on a
HLN4925D Personality Board.
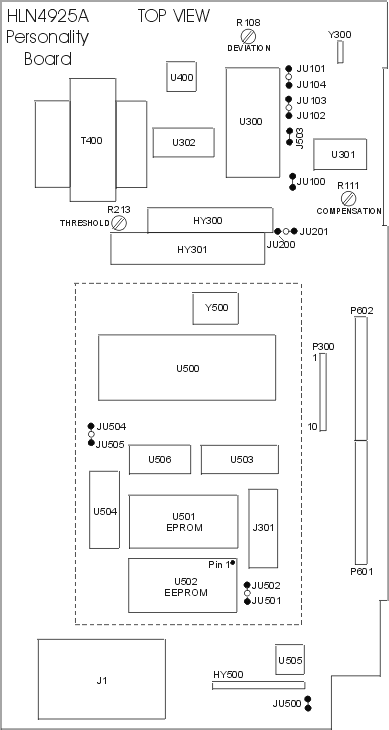
- Here is the jumper locator for
the HLN4925A Personality Board
- Here is the jumper locator
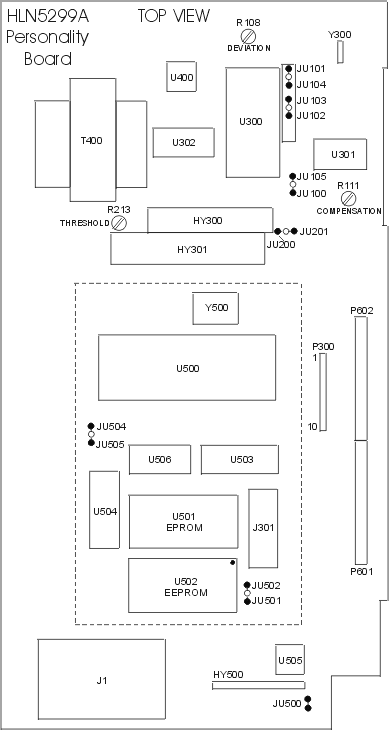
for the top of the HLN5299A Personality Board.
- Here is the jumper locator
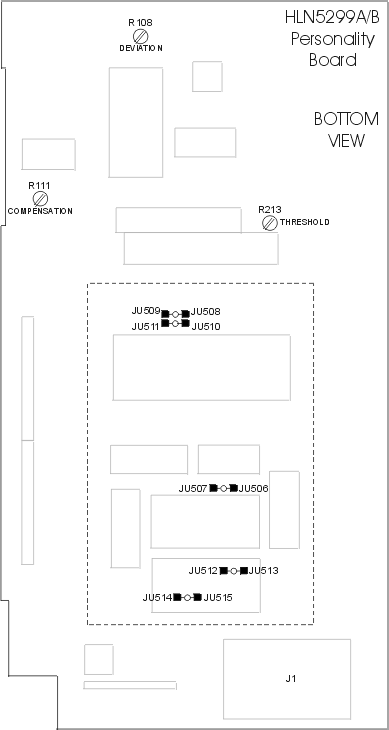
for the bottom of the HLN5299A Personality Board.
- Here is the jumper locator
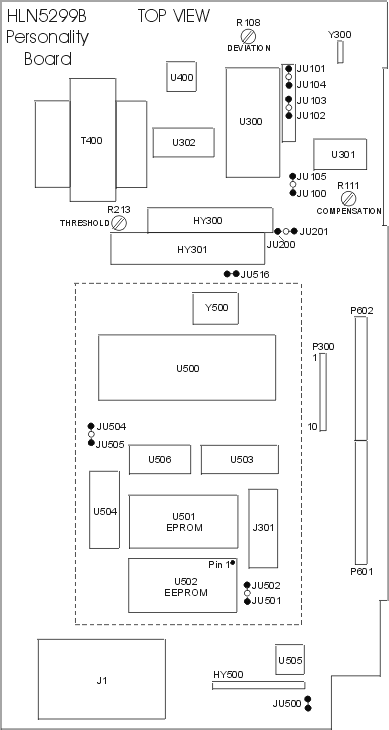
for the top of the HLN5299B Personality Board.
- Here is the jumper locator
for the bottom of the HLN5299B Personality Board.
Personality Board J301 Internal
Option Board(s) Socket:
| 1 |
|
20 |
| 2 |
|
19 |
| 3 |
|
18 |
| 4 |
|
17 |
| 5 |
|
16 |
| 6 |
|
15 |
| 7 |
|
14 |
| 8 |
|
13 |
| 9 |
|
12 |
| 10 |
|
11 |
The J301 Socket pin out is shown above as seen from the top
of the Personality Board (there is a notch between pin 1 and pin
20 on the socket).
| 20 |
18 |
16 |
14 |
12 |
10 |
8 |
6 |
4 |
2 |
| 19 |
17 |
15 |
13 |
11 |
9 |
7 |
5 |
3 |
1 |
P301 Ribbon Cable connector as seen from the side of an Internal
Option Board.
| J301
Internal Option Board Connector |
Socket
Pin # |
Cable
Pin # |
Description |
| 1 |
20 |
Busy (Input/Output) |
| 2 |
18 |
Tx Data (Output) |
| 3 |
16 |
Switched + 5 Volts (Input) |
| 4 |
14 |
Unswitched + 5 Volts (Input) |
| 5 |
12 |
Digital Ground |
| 6 |
10 |
Analog Ground |
| 7 |
8 |
Switched + 9.6 Volts (Input) |
| 8 |
6 |
VAG |
| 9 |
4 |
Detected Audio (Input) |
| 10 |
2 |
Option Rx Audio (Output) |
| 11 |
1 |
Mic. Hi (Input/Output) |
| 12 |
3 |
Option Tx Audio (Output) |
| 13 |
5 |
Internal Securenet Code Storage Battery (Input) / Spare |
| 14 |
7 |
Filtered Audio (Input) |
| 15 |
9 |
JU504 - Xtal Shift / JU505 - Trunking / Spare |
| 16 |
11 |
Internal Securenet Write Enable (Input) |
| 17 |
13 |
Internal Securenet KID (Input) |
| 18 |
15 |
Internal Securenet KEY (Input) |
| 19 |
17 |
Reset (Input/Output) |
| 20 |
19 |
Rx Data (Input) |
- The input and output notes in parenthesis are with respect to the
Internal Option Boards.
- The socket is a 20 pin Dual In-Line Package (DIP) socket.
- The 20 wire ribbon cable is
flat with one or two 20 pin Internal Option Board connectors, depending
on the part number.
- Both the 20 pin DIP J301 socket and ribbon cable have different
pin numbers for the same wire/connection. It can be very
confusing, unless you are aware of it and looking for it. Different
manuals use one or the other pin out, which can be confusing all by
itself. Use the above table to translate the socket and ribbon cable
pin numbers.
- The VAG is a special analog ground voltage. It is about 1/2 of
the + 9.6 volt supply (i.e. about + 4.8 volts). This is used by Op-Amps
with a single + 9.6 volt power supply, to bias the amp so it can
reproduce both positive and negative analog signal levels. Without the
VAG, Op-Amps would require both plus and minus voltage power supplies
for these types of analog signals.
- There is an optional internal Securenet Code Storage Battery
located on the radio drawer Common Circuits Board (if it is installed).
- Socket pins 16, 17 and 18 are only used when an Internal Securenet Board is
installed inside the radio drawer. A special HKN4256A radio cable with a
keyloader port is used to access these three socket pins. Special U501
firmware may be required to use a radio drawer internal Securenet
board.
- See the Systems 9000 page for an
explanation of the Tx Data, Rx Data, Busy and Reset lines.
- Socket pin 15, Xtal Shift, is not supported by many of the
conventional Internal Option Boards.
- This J301 socket is also found on the External Options Housing circuit
board, Siren/PA circuit board
and Advanced Securenet Physical
Security Housing circuit board. Socket pin 15 is a Spare line on
all these other circuit boards. Socket pin 13 is also a Spare line,
except on the Securenet Physical Security Housing (this optional
battery is located inside the Securenet Housing).
- The Vehicle Repeater System (VRS) uses this socket to connect the
VRS circuit board. The VRS circuit board can be installed inside an External Options Housing or a Siren/PA Housing (a special low profile shield is required for the
Siren/PA Housing).
- This drawing shows a
functional block diagram with the J301 socket and its major
connections.
Common Circuits Boards:
Here is a part number list of the Syntor X 9000 Common Circuits
Boards.
- HLN5222B - Low Band.
- HLN4906A/B - VHF.
- HLN4905A - UHF (early version radios).
- HLN4905B - UHF (all X 9000 & X 9000E range 1 - 78/100
Watt Radios).
- HLN5152B - UHF (X 9000 range 2, 3, 4 and 5 - 30 Watt Radios).
- HLN5448A - UHF (X 9000E range 2 - 100 Watt Radios).
- HLN4971A - 800 MHz.
The common circuits board has the Tx power and Tx current limit
adjustment controls on it.
The Low Band and VHF Common Circuits Boards have no jumpers.
The UHF boards have jumpers JU900 and JU901 and the 800 MHz boards
have jumpers JU950 and JU951. No information is provided on any
optional settings or configurations for these jumpers so they
do not appear to be meant to be changed.
Some Syntor X 9000 radios have a ground
jumper wire attached to the
common circuits board and the chassis. Radios with this jumper wire
cannot be used in a positive ground installation. These radios are
supposed to have a sticker inside on the chassis near the common
circuits board that has a negative ground installation only warning. If
one of these radios is installed in a positive ground vehicle, exepct
the radio to be heavily damaged (PC board copper traces on the common
circuits board will probably be vaporized as the main 40 amp power fuse
blows).
Control Head Circuit Board Pin
Out:
J1 DB-50 connector Systems 9000 connector viewed from
back of the control head.
| Spectra Systems 9000 Control Head Connector |
Control
Head
DB-50
J1
Pin # |
VIP /
DEK |
Mic. |
Radio |
Radio Pin
Description |
| 1 |
x |
|
|
VIP Out 2 (Output) |
| 2 |
x |
|
|
VIP Out 1 (Output) |
| 3 |
x |
|
|
VIP In 2 (Input) |
| 4 |
x |
|
|
VIP In 1 (Input) |
| 5 |
x/x |
|
|
DEK Data Out (Output) |
| 6 |
|
|
|
Pin Removed |
| 7 |
|
x |
|
Mic. Low (Input) |
| 8 |
|
x |
|
Mic. Hi (Input) |
| 9 |
|
|
|
Pin Removed |
| 10 |
|
|
x |
Speaker Audio
Low (Output) (BLK/GRN
Wire) |
| 11 |
|
|
x |
Speaker Audio Low (Input) |
| 12 |
|
|
x |
Mic. Hi (Output) |
| 13 |
|
|
x |
Mic. Low (Output) |
| 14 |
|
|
x |
BATT-
(shorted to Pin 31) |
| 15 |
|
|
x |
Ignition + (Input) (Orange wire) |
| 16 |
|
|
x |
Analog Ground |
| 17 |
|
|
x |
Bus + (Input/Output) |
| 18 |
x |
|
|
Switched B+ (Output) |
| 19 |
x |
|
|
Switched B+ (Output) |
| 20 |
x |
|
|
Digital Ground |
| 21 |
x |
|
|
Digital Ground |
| 22 |
|
|
|
Pin Removed |
| 23 |
|
x |
|
PTT/HUB Reference (Input) |
| 24 |
|
x |
|
PTT (Input) |
| 25 |
|
|
|
Pin Removed |
| 26 |
|
|
x |
Reset (Input/Output) |
| 27 |
|
|
x |
Emergency (Output)
(see notes below) |
| 28 |
|
|
x |
Spare 1 |
| 29 |
|
|
x |
Spare 2 |
| 30 |
|
|
x |
BATT+
(shorted to Pin 47) |
| 31 |
|
|
x |
BATT-
(shorted to Pin 14) |
| 32 |
|
|
x |
Ignition - (Input) |
| 33 |
|
|
x |
Busy (Input/Output) |
| 34 |
x/x |
|
|
VIP Out 3 (Output)
/ DEK Strobe (Output) |
| 35 |
x/x |
|
|
Switched B+ (Output) |
| 36 |
x/x |
|
|
Digital Ground |
| 37 |
x/x |
|
|
VIP In 3 (Input)
/ DEK Data In (Input) |
| 38 |
x/x |
|
|
DEK Clock (Output) |
| 39 |
|
|
|
Pin Removed |
| 40 |
|
x |
|
Hang Up Box (HUB) (Input) |
| 41 |
|
x |
|
Switched B+ (Output) |
| 42 |
|
|
|
Pin Removed |
| 43 |
|
|
x |
Speaker Audio
Hi (Output) (BLK/ORG
Wire) |
| 44 |
|
|
x |
Speaker Audio Hi (Input) |
| 45 |
|
|
x |
Detected
Audio (Input) (N.C.) |
| 46 |
|
|
x |
Option Tx
Audio (Output) (N.C.) |
| 47 |
|
|
x |
BATT+ (Input) (Green Wire)
(shorted to Pin 30) |
| 48 |
|
|
x |
Switched B+ (Output) |
| 49 |
|
|
x |
Digital Ground |
| 50 |
|
|
x |
Bus - (RS-422
Input/Output) |
- N.C. is an abbreviation for No Connection.
- The input and output notes in parenthesis are with respect to the
control head.
- Since these control heads have a single large DB-50 connector
that was divided into three sections, check boxes were added to help
easily identify the Radio, Microphone, VIP and DEK Expansion connector
pins.
- The yellow highlighted pins with a wire
indicated in the description do not go to the radio. These wires
are only attached to the control head connector (these wires are not
present on optional rear control head cable).
- For negative ground cables, the green wire (BATT+) and orange
wire (Ignition+) that are attached to the control head side of the
radio cable need to be fused and attached to the battery + voltage. The
green wire provides power to the control head. The orange wire is used
in conjunction with the RSS programming. If the orange wire is attached
to an automotive circuit that is only on when the ignition key is on,
the radio can be programmed to only allow transmitting when the
ignition key is on.
- The default VIP port automatically switches into a DEK Expansion
port configuration whenever a DEK is programmed into the radio's code
plug. The DEK or DEKS provide VIP II connection pins.
- Keep in mind, the J1 pin assignments can be changed with
the control head chip resistor jumpers in SP control heads. The SMD
control heads have internal jumpers that can reconfigure some of the
control head pins. Other models of control heads should be checked for
physical modifications (i.e. cut PC traces, wire jumpers and extra
components soldered point to point on the PC board). Expect to find
modifications on control heads with a kit number below the model
number.
|
SYSTEMS 9000
HCN1033, HCN1041, HCN1045 and HCN1047 Control Head Board Jumpers
|
| Jumper |
HLN4709A
display
HLN4709A
control |
HLN4709D
HLN4896C
display
HLN4709D
control |
HLN5104D
display
HLN5014D
HLN5014E
control |
Description |
| JU1 |
x |
x |
x |
out (for future expansion) |
| JU2 |
x |
x |
x |
in (for 6301X Micro) |
| JU3 |
x |
|
|
out (selects internal mP ROM) |
| JU4 |
x |
x |
x |
in for 32 Modes |
out for 64+ Modes |
| JU5 |
x |
x |
x |
out for 32 Modes |
in for 64+ Modes |
| JU6 |
x |
x |
x |
in (selects internal mP ROM) |
| JU20 |
|
x |
x |
in (switched +12 to mic pin 41) |
| JU22 |
|
x |
x |
in (PTT/HUB Ref) |
- All jumpers are located on the Control Board. The display boards
are shown with the Control Boards they are used with except for the
HLN4896C. This Display Board is used in the HCN1032 control head and
its Control Board is not shown. All of these jumpers are soldered in
zero ohm chip resistors. The HLN4896C and HLN4709D Display Boards
are identical except for their part number and are completely
interchangeable. It is the HLN4896C and HLN4709D Control Boards
that are different and incompatible.
- The grayed out jumpers are not present or not used.
- The control head firmware is located inside the microprocessor IC U1. Even though there are
jumpers for an external firmware ROM, there does not appear to be
anyplace to plug an external ROM into the Control Board. The processor
chip U1 is NLA from Motorola and was factory programmed so take real
good care of the ones you have. There is also a special version of U1
that is used for MDC-1200 signaling.
- All of these boards have parts list jumpers that do not match the
boards, schematics or jumper table. So the jumpers on the parts lists
have been ignored.
- The HCN1033 control heads use the HLN4907 series boards.
- The HCN1041B control head uses the HLN4897 series boards.
- The HCN1045 and HCN1047 control heads use the HLN5104 series
boards.
- There are probably other Systems 9000 control heads that use
these boards that I do not have the control head part numbers for.
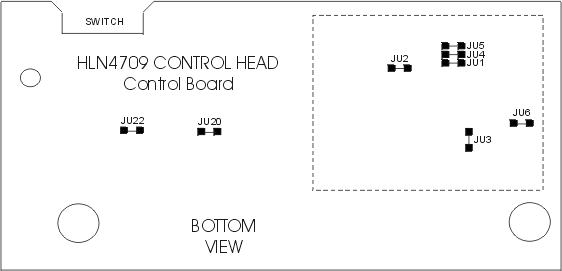
- Here is the jumper locator for
the bottom of the Control Board. Use this locator for all of the
above Control Boards, just ignore the jumpers for different models that
are grayed out in the table.
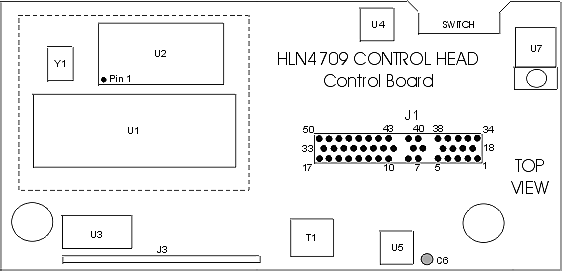
- Here is the parts locator for
the top of the Control Board. Use this locator for all of the above
Control Boards.
SYSTEMS
9000
HCN1063A and HCN1073A Control Head Board Jumpers |
| Jumper |
HLN5464A
display
HLN5464A
control |
HLN6284A
display
HLN6284A
control |
HLN6284C
display
HLN6284C
control |
Description |
| JU001 |
x |
x |
x |
in (A+ J103-47 to Power Switch) |
| JU002 |
x |
x |
x |
out (special
applications) |
| JU003 |
x |
x |
x |
in (Sw B+ to J103-41) |
| JU004 |
x |
x |
x |
out (special
applications) |
| JU005 |
x |
x |
x |
in (A+ J103-47 to Power Switch) |
|
JU007
|
x
|
x
|
x |
in
(enable OPT 4 LED - over display) |
| JU008 |
x |
x |
x |
out
(special applications) |
| JU009 |
x |
x |
x |
out (special
applications) |
| JU010 |
x |
x |
x |
out (special
applications) |
| JU011 |
x |
x |
x |
out (special
applications) |
| JU012 |
x |
x |
x |
out (special
applications) |
| JU013 |
x |
x |
x |
out (special
applications) |
| JU014 |
|
|
|
|
| JU015 |
|
|
|
|
| JU016 |
x |
x |
x |
out (special
applications) |
| JU017 |
x |
x |
x |
out (special
applications) |
| JU018 |
x |
x |
x |
in (Speaker Hi J103-43 to J103-44) |
| JU019 |
x |
x |
x |
in (Speaker Hi J103-43 to J103-44) |
| JU020 |
x |
x |
x |
in (Mic. HUB enable J103-40) |
| JU021 |
x |
x |
x |
out (special
applications) |
| JU022 |
x |
x |
x |
out (special
applications) |
| Unknown |
|
|
x |
??
undocumented jumper |
- The highlighted jumpers are located on the Display Board. All
other jumpers are located on the Control Board. The Display Boards are
shown with the Control Boards they are used with. All of these jumpers
are soldered in zero ohm chip resistors. All of the "special
applications" jumpers are explained in supplemental manuals provided
with the modified control heads.
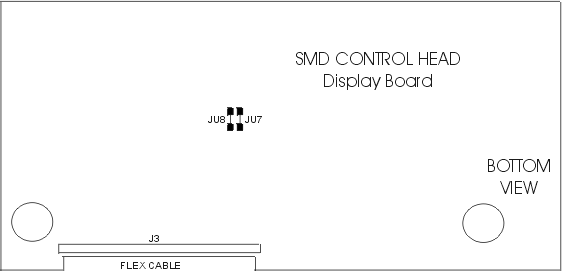
- Display Board jumpers JU007 out and JU008 in is
used by the Advanced Securenet Physical Security Housing. It allows the
Securenet Board to directly control the Option 4 LED above the vacuum
fluorescent display.
- JU001 and JU005 are in parallel.
- JU018 and JU019 are in parallel.
- JU014 and JU015 are on the HLN6284A parts list, but apparently
not on the schematic or PC layout so they are shown grayed out.
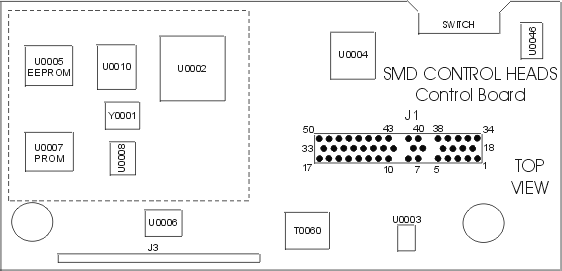
- An 8 kilobyte soldered in SMD
EEPROM U0005 is the only one
available on these control heads so they are already 64+ mode
compatible.
- The control head firmware is located inside the SMD PROM IC U0007. There is HVN4026A firmware
just for the Syntor X 9000.
- Both of the above control heads use Surface Mount
Device (SMD) flat
package Integrated Circuits (ICs).
- The HCN1063A (later version) control head uses the HLN5464A
(SMD).
- The HCN1073A (latest version) control head uses the HLN6284A
(SMD).
- The HCN1062A (32 modes only) uses boards I do not have
any documentaton for.
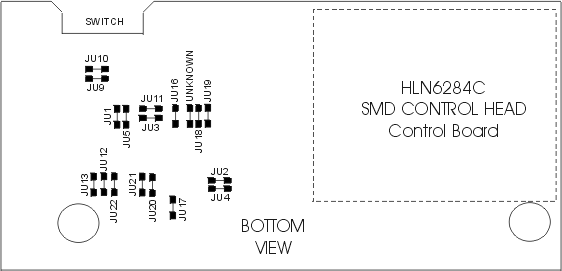
- Some control heads now use a new HLN6284C
Control Board that I have not been able to find any Motorola
Documentation for. There is a new jumper on this board and other
jumpers have been moved. Here is the jumper
locator for the bottom of the new HLN6284C Control Board. The
unknown jumper connects to pin 27 on the control head connector (this
is normally not connected).
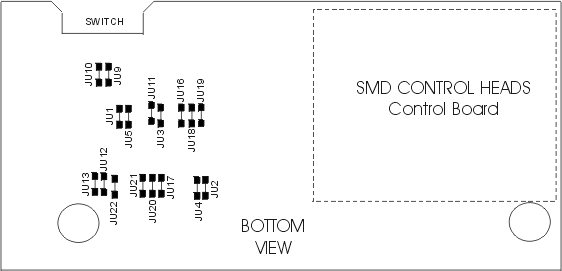
- Here is the jumper locator
for the bottom of the Control Board and the jumper locator for the bottom of the
Display Board. Use this locator for both of the above revision A
Control Boards.
- Here is the parts locator for
the top of the Control Board. Use this locator for both of the
above Control Boards.
DEK Circuit Board Pin Out:
J1 connector viewed from back of the DEK.
| Direct Entry Keyboard Connector |
DEK
DB-50
J1
Pin # |
EXP
Out |
EXP
In |
VIP II
In/Out |
Radio Pin
Description |
| 1 |
x |
|
|
N.C. |
| 2 |
x |
|
|
N.C. |
| 3 |
x |
|
|
N.C. |
| 4 |
x |
|
|
N.C. |
| 5 |
x |
|
|
Data Out (Output) |
| 6 |
|
|
|
Pin Removed |
| 7 |
|
x |
|
Ground - VIP Digital
Ground |
| 8 |
|
x |
|
Data In (Output) |
| 9 |
|
|
|
Pin Removed |
| 10 |
|
|
x |
Ground |
| 11 |
|
|
x |
Ground |
| 12 |
|
|
x |
Ground |
| 13 |
|
|
x |
N.C. |
| 14 |
|
|
x |
N.C. |
| 15 |
|
|
x |
VIP In 1 (Input) |
| 16 |
|
|
x |
VIP In 2 (Input) |
| 17 |
|
|
x |
VIP In 3 (Input) |
| 18 |
x |
|
|
N.C. |
| 19 |
x |
|
|
N.C. |
| 20 |
x |
|
|
N.C. |
| 21 |
x |
|
|
N.C. |
| 22 |
|
|
|
Pin Removed |
| 23 |
|
x |
|
Clock (Input) |
| 24 |
|
x |
|
Strobe (Input) |
| 25 |
|
|
|
Pin Removed |
| 26 |
|
|
x |
N.C. |
| 27 |
|
|
x |
N.C. |
| 28 |
|
|
x |
N.C. |
| 29 |
|
|
x |
N.C. |
| 30 |
|
|
x |
N.C. |
| 31 |
|
|
x |
N.C. |
| 32 |
|
|
x |
N.C. |
| 33 |
|
|
x |
N.C. |
| 34 |
x |
|
|
Strobe (Output) |
| 35 |
x |
|
|
Switched B+ (Input) |
| 36 |
x |
|
|
Digital Ground |
| 37 |
x |
|
|
Data In (Input) |
| 38 |
x |
|
|
Clock (Output) |
| 39 |
|
|
|
Pin Removed |
| 40 |
|
x |
|
Data Out (Input) |
| 41 |
|
x |
|
Switched B+ (Input) |
| 42 |
|
|
|
Pin Removed |
| 43 |
|
|
x |
VIP Out 1 (Output) |
| 44 |
|
|
x |
VIP Out 2 (Output) |
| 45 |
|
|
x |
VIP Out 3 (Output) |
| 46 |
|
|
x |
N.C. |
| 47 |
|
|
x |
N.C. |
| 48 |
|
|
x |
Switched B+ (Output) |
| 49 |
|
|
x |
Switched B+ (Output) |
| 50 |
|
|
x |
Switched B+ (Output) |
- N.C. is an abbreviation for No Connection.
- The input and output notes in parenthesis are with respect to the
DEK.
- Additional information on the DEK is located on this page.
- Since the DEKs have a single large DB-50 connector that was
divided into three sections, check boxes were added to help easily
identify the VIP II input/output, Expansion Input and Expansion Output
pins. The Expansion Input and Expansion Output pins are used to daisy
chain up to 3 DEKs, starting with the Systems
9000 control head VIP port to connect the first DEK.
- The optional VIP hardware uses a 15-80212L01 VIP II Connector Housing.
- A HKN4273A (old part # 3080248L01) DEK cable is used to attach a
DEK to a compatible control head or to attach to extra DEKs (up to 3
DEKs total).
[SYNTOR]
[SYNTOR X] [SYNTOR X 9000
and X 9000E] [TRUNKING SYNTOR
X and SYNTOR X 9000] [SPECTRA]
[INTRODUCTION]
[NEW RADIO INSPECTION] [NEW RADIO MODIFICATIONS] [FAIL AND ERROR CODE PREFIXES]
[SYSTEMS 9000] [PROGRAMMING]
[SYNTOR X 9000 CONVERSIONS] [MODELS] [MANUALS]
[CONTROL HEADS] [DEKS]
[CABLES] [BOARDS] [PARTS]
[OPTIONS and ACCESSORIES] [SYNTOR
X 9000 VISUAL TOUR]
[PL] [DPL] [PAC-PL
and PAC-RT VEHICLE REPEATERS][HHCH] [PROM
PROGRAMMERS] [POWER
WIRING]
[GLOSSARY]
[WEB LINKS] [SURPLUS
PARTS GUIDE] [ITEMS FOR SALE]
[WEB SITE REVISIONS]
[TOP] [X 9000 HOME]
[HOME]
--
PL, Private Line, DPL, Digital Private Line,
MPL, Talkaround, MDC-600, MDC-1200, MVS-20, Securenet, Smartnet,
Privacy Plus, Trunked X2, Trunked X3, Touch Code, Quick Call II,
Channel Scan, Talkback Scan, System 90, System 90*s, Systems 9000,
Mitrek, Micor, Spectra, Spectra II, Astro Spectra, MataTrac, Syntor,
Syntor X, Syntor X 9000 and Syntor X 9000E are trademarks of Motorola
Inc.